Posted on Leave a comment

8 amazing ideas for jute twine crafts

jute twine craft set

If you’re a crafting whizz who’s looking to expand their DIY tool box, investing in jute craft twine is the way to go. These rustic twines are a fan-favourite simply because of their immense durability. They’re strong, they look great, and they’re plant-based, making them both biodegradable and sustainable – what more could you ask for? 

Jute twines are made from variations of jute plants which produce fibres that can be spun into twines of various thicknesses. Jute plants are easy to grow and have become a popular alternative to wool and cotton.  

Jute twine craft ideas

Scrapbooks

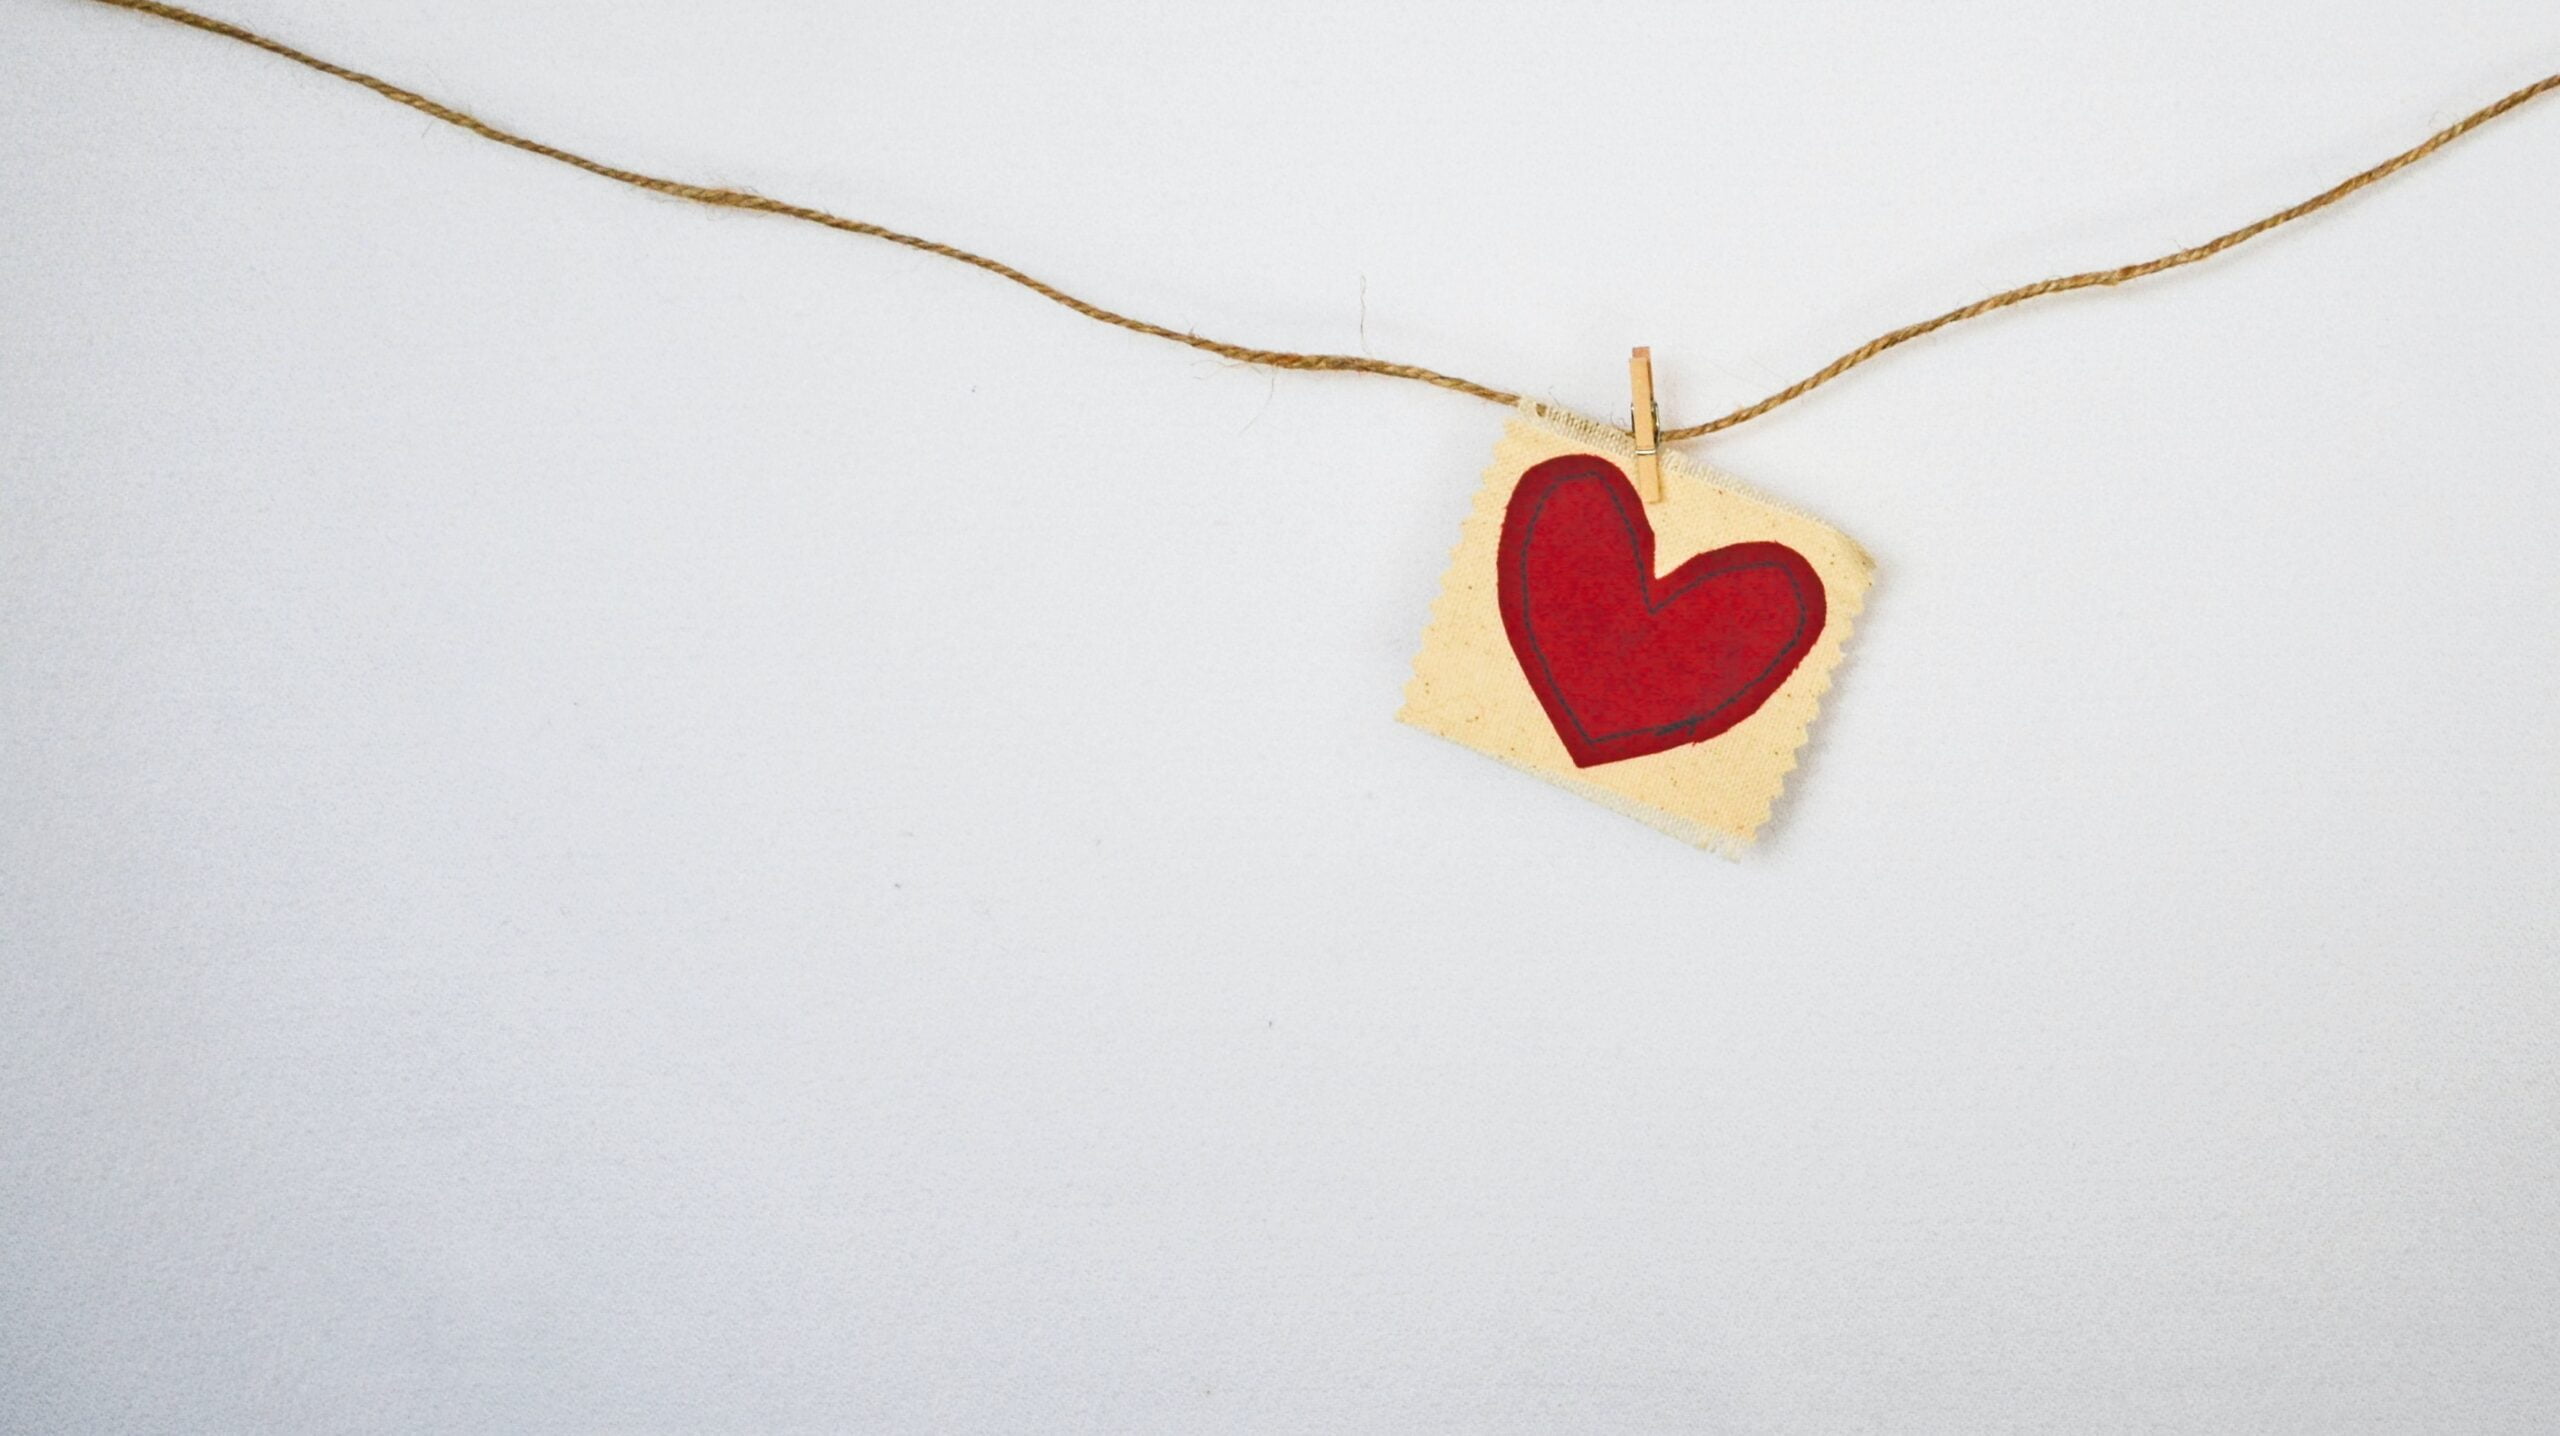
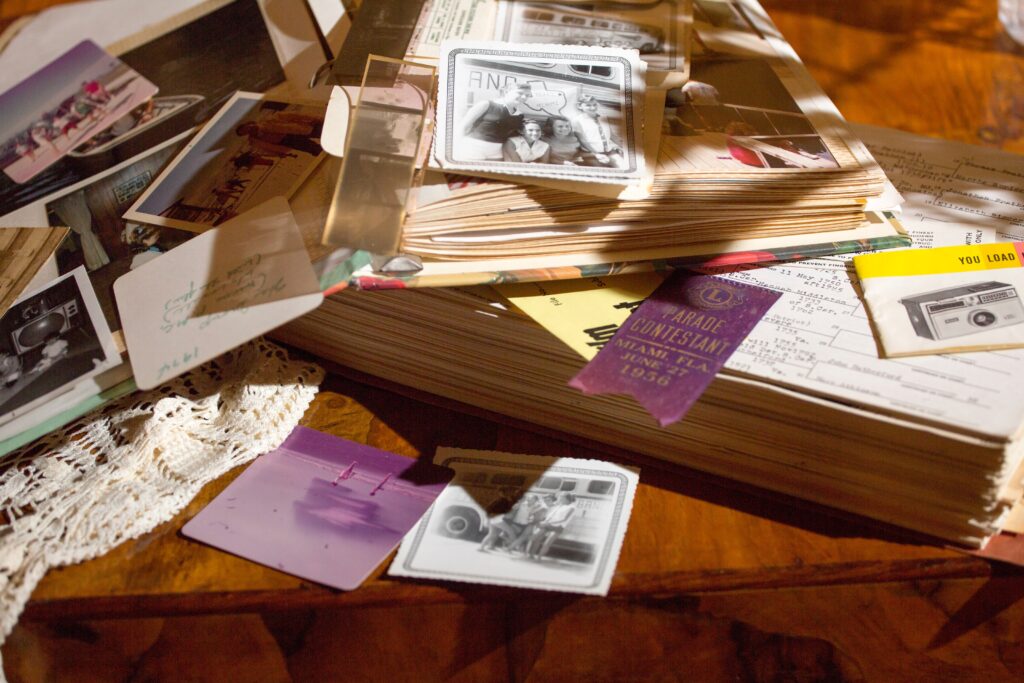
Remember making scrapbooks when you were young? Add some nostalgia to your life and put together a scrapbook with the help of jute twine – the perfect way to document a day out you want to remember. Connecting photos together is an essential part of scrapbooking, so with your jute twine in hand, cut various lengths and pin or stick down to your scrapbook pages. Place your photos In between the pieces of jute twine so they appear connected. 

Another great use for jute twine is using it to tie a scrapbook shut. Cut one long piece of jute twine into two, and on both the front and back covers, near the page edge, glue one end of the twine to the cover. Allow this to dry, and then if you want an additional personal touch, add a piece of coloured tape over the twine end before you tie your book shut.  

Crochet

Why not hop onto the crafting trend that’s recently taken the world by storm? Get out your crochet hooks and pick some coloured jute twine to craft your very own clothing, accessories and decorative pieces. Although this twine is stiffer than your usual wool or yarn, it works exactly the same, and can be great for making ornaments that require a little bit more structure. 

One of our favourite things to crochet with jute twine is coasters. They look amazing on a coffee table and they hold their shape well. If you’re looking for a larger craft project, crocheting a jute twine rug is another amazing idea – just ensure that you’ve got enough twine for this! Whether you’re a crochet fanatic or a complete beginner, why not open up a few YouTube tutorials and give it a try?

Hanging decorations

Do you have some decorations collecting dust that you’ve been meaning to put up, but you have nothing to hang them with? This is where jute twine comes in. You could use a few different colours of jute intertwined to make a beautiful twine rope that’s perfect for exactly this. 

If you’re looking to follow this method, we suggest taking three different coloured jute twines, cutting each to the same length and then begin wrapping them around each other. Once you’ve done this, make a knot at each end to secure your jute twine creation and begin threading or hooking your decorations on. Hanging this on your wall will add a pop of colour to your home, whilst utilising unused decorations. 

Plant pot covers

Bring some of that rustic charm into your home with self-made jute plant covers. Grab your chosen jute twine, a simple plant pot, PVA glue, and you’re good to go. Apply glue to the section of the plant pot that you want your jute twine to cover, and then carefully wrap your twine around the glued section of the plant pot. Make a striped effect by using a variety of jute colours – the perfect way to brighten up your plant pots. 

Making Christmas ornaments

One of our favourite things to craft around Christmas time is jute twine baubles. They’re easy to make and look great hanging from tree branches. If you’re thinking of making a few jute twine baubles in time for Christmas, we have the perfect method for you. 

To get started, pick up a few balloons, PVA glue and a variety of coloured jute twine. In a bowl, mix some water and glue, and place  jute twine strands in a bowl until fully coated. Blow up a few balloons – to whatever size you’d like your baubles to be – and begin wrapping your glue-coated jute twine around the balloons. There’s no right or wrong way to wrap your twine, but make sure that it’s tight. Leave your jute twine creations out to dry overnight, and when dry, pop the balloon inside. 

Now you have some amazing, hand-made baubles for your tree!

Weddings

Planning a wedding but it’s missing that personal touch? Get crafty and make some place cards, or send out handmade invitations. Add some spark with coloured jute twine, using it to tie your invitations shut, or create a cute, rustic border around your guest’s name cards. You might even want to incorporate jute twine into your flower arrangements and bouquets as an extra touch.    

Macrame decorations

Are you a lover of macrame? Or do you fancy uptaking a new crafting hobby? If this is the case, you can rely on jute twine to satisfy all of your macrame crafting needs. 

Macrame is a textile technique produced by knotting twine, string, or any chosen material to create a pattern. Jute twine, along with macrame twine, works amazingly in macrame decorations to brighten up your living room or bedrooms. There are a variety of macrame-based decorations, from hanging plant pots, to dream catchers – macrame designs have endless possibilities. 

Bracelets

Everyone loves a hand-made bracelet, so why not use jute twine to make yours, or surprise friends and family with a personalised gift. Grab your choice of coloured twine, pick out some pretty beads and get to work. How you make your bracelet is up to you, but if you’re looking for design inspiration, head on over to our previous blog post on how to make a friendship bracelet to support all of your crafting needs.

Present decorations

Jute twine is perfect for eco-friendly gift wrapping – especially when paired with biodegradable paper – and a go-to choice for lovers of the rustic aesthetic. Use this crafting saviour by wrapping it around presents to keep the paper secure, or use it to secure tags onto gifts and gift bags. So, next time you’re wrapping up a present for a loved one or a friend, bring a bit of jute twine to the table. You won’t regret it.

Can’t decide which jute twine to go for? Why not experiment with colours and opt for an assorted pack? Or, browse through some of our other ropes and twines to find the best crafting equipment for your next project. Let us help with your decision by getting in contact with our team of professionals today.

Posted on Leave a comment

Decking ideas for small gardens that are perfect for summer

As spring transitions into summer, and homeowners brace themselves for the return of garden parties and barbeques, it’s the perfect time to show off your outdoor space. However, for gardens that are on the smaller side, redesigning your set-up without minimising available room can often seem like an impossible task. That’s where we step in. 

This collection of decking ideas – ideal for warmer seasons – should (hopefully) fill your mind with plenty of inspiration, so that you can start effortlessly transforming your small outdoor space. 

Circular decking

Move away from traditional decking design and go circular, embracing geometric designs rather than hard edges. Used as a way to set your outdoor space apart from your neighbours, complete your modern set-up with angular furniture and a curved plant border to make your decking area a feature piece. 

Complementary decking colour

The colour you choose for your decking can completely transform your outdoor space, and with an ever-expanding list of tones and shades to take your pick from, it’s never been easier to complement your home’s aesthetic. Whether you opt for a minimalist grey, earthy browns, or even a striking dark blue, make sure to pick some garden furniture that blends beautifully with your chosen decking colour to avoid making your space look crowded. 

Design a walk-way

Perfect for adding an element of playfulness to your garden, a path will trick the eye and create the illusion of increased space. Customise the surrounding area as you wish, perhaps framing your walkway with stones, tall plants and glowing floor lights to illuminate your garden.

Take your visitors on a sightseeing journey around your garden with a pathway that leads up to a featured seating area for kicking back and relaxing, or to a snap-worthy viewing point that’s worth showing off. 

Multilevel decking

Compromised on space? The answer is multilevel decking. By establishing distinct zones for varying purposes – whether that’s a cooking area complete with a fire pit, or a seating area for some outdoor, summer relaxation –  this is a great alternative for enhancing visual interest. Use steps or even a small bridge, made with wooden planks and decking ropes, to easily make your way between areas. 

Enclosing your space

If you’re looking for extra privacy, there are plenty of creative methods to enclose your decking area. Decking ropes are brilliant for just this, which vary in material and thickness, so you can customise your garden space in a way that seamlessly blends in with your desired aesthetic.

From nautical-esque manilla decking ropes that certainly wouldn’t look out of place in a rural setting, to sisal decking ropes that are great for complementing timberwork, create a rope railing that best suits your preferences.

Choosing decking furniture

Naturally, furniture preferences will vary between individuals, but for those with a smaller garden, we advise choosing compact furniture. These will be much easier to store away when summer skies turn to gloomy clouds, and they’ll make your decking area look much less cluttered. 

Multifunctional outdoor furniture is another efficient way to maximise available space – who wouldn’t fall in love with a bench that can convert into a coffee table, or seats that open up to become storage units? Choose pieces that will make your life easier. 

Lighting

Now that you’ve filled your decking area with plenty of outdoor furniture, it’s time to start adding the finishing touches. Lighting can completely change the mood, so why not show off your newly designed garden space with twinkling string lights? Ideal for hosting summer parties. 

Keen to enhance your decking area? Get started today and explore our vast stock range of ropes and twines – we’ll have just what you need to start your next DIY project. Contact us today to find out more.

Posted on Leave a comment

How to create space decor for your home

Is reality getting you down? Fancy hopping in a spaceship and zooming off to another galaxy? For those who love a good crafting project, you’re sure to go all starry-eyed over these other-wordly space decor ideas for your home – perfect for adding a sense of playfulness to your space. 

Star light garland

For walls that are looking a little drab, why not decorate with a twinkling star light garland? Either cascade from your bedroom ceiling to pretend you’re gazing up at the night sky, or hang in your living room to instantly transform an area from cold to cosy. If you’ve got some Christmas lights that are collecting dust in your attic, why not put them to good use and incorporate them into your star light garland design?

To start, get some crafting foam and cut out star shapes, adding a hole to the middle for the lights to be pushed through. After doing this, screw the bulb back into the cord.

Following a similar method – which is ideal for those who also love a bit of nautical home decor – use manilla rope to create a thicker garland, twisting some fairy lights around it to enhance the outer space aesthetic. Finally, attach your stars to the thicker rope with some cotton string, knotting each in place as you go along. 

Planet mobile

Stare into space with a planet mobile 

Create your own mini solar system with this space mobile, using just a few simple tools. To begin, use a compass to sketch out your planets and sun onto a piece of white card. Once you’ve cut these out, you can paint them in a variety of different colours, using swirling and splodging techniques to add further depth.

To create a 3D effect – and to make your crafting project look all the more lifelike – you could make a slit from one edge of your planet to the centre, repeating the process with another circle template, slotting them together.

Next, make a small hole at the top of each planet, threading a piece of cotton string through, securing everything in place with a tight knot. The top of these pieces of string can then be attached onto a large circular cut out, made with a black piece of card – simply use a pin to make the small holes to indicate where you want your planets to hang. 

Outer space sun catchers

There’s no need for a telescope with DIY cosmos sun catchers – bring the cosmos to your living room as the sun seeps through the magical kaleidoscope of colours.

For this space-themed project, you can upcycle some clear plastic plates or containers that are no longer in use, which will be your base. Purchase some stained glass paints in colours of your choice, some white acrylic paint, and some paint brushes so you can start bringing life to these captivating pieces. Of course, precision isn’t necessarily needed during the initial steps, as you’ll want the paints to collide with one another to give the impression of a swirling cosmos.

Once you’ve left your paint to dry overnight, you can sprinkle some acrylic paint diluted in water over the top to make your stars, using some glitter for an added touch of sparkle. Finally, cut out circles of varying diameters, and now you’re ready to stick these beauties to your window. 

Constellation canvas

Unleash your inner artist and part-time astronomist with a lighted constellation canvas. Head over to your local craft store and locate a regular, white canvas (in a size of your choice) and a tub of black paint for the night sky you’re about to create.

Paint the entirety of your canvas black, and once this has dried, you can use a white marker pen to start sketching out your chosen constellation – armed with a reference image. This could be picked at random, or perhaps you’d like to choose one that belongs to your star sign?

Once you’ve finished sketching the constellation, punch some holes in the back of your canvas in areas where you’d like your lights to shine through. Now switch on those lights, find the perfect place to hang your fantastic new piece, and admire your outer space creation. 

Galaxy drink coasters

In search of some quirky table accessories that are out of this world? Look no further than these creative DIY galaxy drink coasters.

Using an unfinished wooden coaster as your base, paint this black with some multi-surface paint. Once left to dry, use a sponge coated in shimmery paint to dab random splodges of colour over the top. Give your sponge a clean, and throw another colour into the mix – it’s okay if they start to overlap. For the galaxy look, add more black paint over the top, dabbing gently to create a cloudy, dream-like pattern.

Next, use glitter paint to add some stars, and – once left to dry – pour a thin layer of Mod Podge on top, spreading it right up to the edge of your coaster with a paintbrush. Leave for up to 24 hours, and now you’ve got yet another brand new piece of space inspired decor. 

Here at Rope Source, we have everything you need for your next crafting project – whether you’re transforming your home decor or otherwise. Get in touch with our team today to discover quality ropes and twines

Featured image credit: Mon Makes Things

Posted on Leave a comment

Craft twine ideas to keep the family busy

Twine craft heart design

How do you and your family spend rainy days? The thought of having to stay indoors, desperately finding something to keep the kids occupied is enough to frazzle any parents – this tricky scenario is all too common. We’re here to provide you with a number of solutions, all of which will involve getting those crafting hats on for a spot of DIY. Craft twine can be incorporated into a number of creative projects, so pick your favourites and get stuck in.

Scrapbooking

Who doesn’t love a nostalgic scrapbooking session? If you’re looking for a place to store all of your favourite memories, other than Instagram, this could be the perfect crafting idea for you and the family. When you next head off on a day out, take a few snaps and find certain objects that will remind you of your trips – whether that’s leaves, pinecones or a postcard, the choice is yours to make. The key is to create a medley of textures, with each page being completely different to the next. Create your own stencils using natural cotton string, or stick a few snips of jute craft twine to the page, positioning these between other objects, for a rough feel. 

Wall decor

Are your walls looking a little bland? We hope that your family will love this DIY craft string wall decor method as much as we do. Using a wood tile for the backing, a pencil to create your stencil, scissors, glue, and of course your craft twine to form a shape or word that’s meaningful to you; you can make something sentimental, and completely unique. For a splash of colour, decorate with stamps, paint and glitter. Don’t forget to secure a snip of twine to the back of your piece so that you can hang it up on the wall for all to admire. 

Gift wrapping

Sometimes it’s not all about what’s inside the parcel, but how it looks when it’s first presented. Being a super simple craft – and a great way to teach the kids how to wrap their own presents – anyone and everyone can get involved. Use your twine to make gift tags, or wrap your gift up in a bow, weaving in pinecones or dry flowers for a rustic feel. When paired with recyclable kraft paper and plastic free tape, everything is completely biodegradable, too.

Twine bunting

Whether you’ve got a big celebration planned, or maybe you’re just looking for a way to spruce up your home’s interior, craft twine can be used to string together paper party bunting. Once you’ve drawn and cut out your bunting templates in a shape of your choice and have decorated them to your heart’s content, you can measure out the placement of the holes, marking each with an X. Use a paper punch to cut them out and measure out a suitable twine length – this will depend on how far you’d like your bunting to reach around the room. Then you can start stringing the twine underneath each piece of bunting to keep it hidden. Add tape as you go along to secure everything in place – a grown-up’s help may be needed for this bit. 

Planters

For lovers of nautical home decor, a twine wrapped planter could be just the thing you need to finish off your table tops. Being yet another super simple method, all you’ll need to do is wrap twine around your plant pots, securing everything down every so often with a spot of glue (an adult can do this bit). Make sure there aren’t any gaps for a seamless finish.

Milk bottle vases

Got some empty milk or wine bottles that are taking up space? Why not put them to good use? A similar method can be used as above – either wrap your way from the bottom to the top, or paint your bottle and wrap your twine half way for some added interest. 

Twine bracelets

If you’ve read our previous blog post on how to make a friendship bracelet, you’ll know that twine can be weaved in all sorts of wonderful ways, with each variation creating a different effect. We’ve already discussed how coloured macrame string and decorative braids can be used for this, but if you want to make a chunkier bracelet with added texture, twine is another option. Personalise yours as you wish by weaving in buttons or beads. 


Looking for some more crafting ideas? Here at Rope Source, we have everything you need for your next DIY project. Get in touch with us today to discover the ideal resources for you.

Posted on Leave a comment

Top tips for new homeowners

Small house with keys

We understand that moving house can be a stressful process; with so many factors to consider, it’s easy for your head to become scrambled. To help you prepare for your next chapter, we’ll be sharing our new homeowner tips to make a smooth transition. We’ll be covering everything from when and how to start planning, right the way through to the exciting part; decorating. Now that you’ve got your pen and paper at the ready, let’s get started. 

How to plan moving out

It’s never too early to start planning the big move. It can be underestimated how long it takes to plastic wrap all of your valuables, form a collection of boxes in various different sizes, along with the tedious process of then labelling every box. Sounds draining, right? The key is to start as early as possible, creating a clear list of each task you need to complete before moving. You can then organise these based on priority. Nothing good comes from rushing, and you might even end up forgetting something. Take a gradual approach, hack away slowly, and try to keep calm. 

Home removals

Now that all of your belongings are safely packed up in boxes, don’t risk playing Tetris in your boot. The process will be made much simpler when relying on the help of a removal company – make sure to book them in advance. To help out, dismantle larger items prior to your move to prevent walls getting scraped.

Cleaning

There’s no avoiding it, a big clean up of your new home will have to take place at some point. It’s easier to pay a visit before moving in (if possible) so that you can get everything looking shipshape, and you won’t need to worry about working around your furniture. If your home is a new build, check for any screws, nails or hooks on the floor, and give everything a good dusting. 

Meeting the neighbours

Introducing yourself to the neighbours may seem like a daunting task, but if you avoid it, you could end up missing out on making friends for life. As cringy as it sounds, why not say hello armed with a plate of bakes, with the hope that they’ll return the favour at some point. Alternatively, if the weather is warm, organise a BBQ to show off that wonderful new garden of yours. Alongside the social benefits, you could also take the opportunity to ask them whether there are any plumbers or electricians they regularly rely on – which is ideal if you experience any future hiccups. 

Decorating your new home

This is where you can start to turn your house into a home, and it’s the perfect opportunity to unleash your creativity. Although it’s tempting to go overboard with brand new decor, why not save yourself some cash – and have a bit of fun – with a DIY project? For those who dream of a rustic aesthetic, get inspired and have a read of our previous blog post; simple nautical home decor ideas. Jute rope and manilla rope are ideal for home decor, so whether you choose to create a coaster, beachy mirror, or rope entry mat, let your imagination run wild. And don’t stop there. Kit out your new garden with decking ropes, outdoor furniture and twinkling fairy lights for ambiance. Need some inspiration? Head over to our previous blog post for some more fabulous decking for your garden ideas

Homeowner’s journal

It’s likely that you’ll start collecting plenty of paperwork as you settle into your new home, but storing all documentation – from maintenance receipts to insurance papers – in a homeowner’s journal is a great way to stay organised. 

From kitting out the inside of your home, to impressing your new neighbours with your garden decor skills, Rope Source has everything you need to get started. Get in touch with us today to learn more about our range of ropes, cords and twines

Posted on Leave a comment

How to create a rainbow rope wall hanging

Rainbow rope decoration

For all the crafting fanatics out there, this next DIY project certainly isn’t one to be missed. A rainbow rope wall hanging is ideal for adding a touch of playfulness to your home décor – be it for a child’s bedroom, for brightening up your lounge, or to be used as a fun gift to put a smile on a friend’s face. So, if you’re in search of a pot of gold at the end of the rainbow, this super simple method could be the one to clear away the clouds. 

What will you need?

To craft your very own rainbow rope wall hanging, you’ll need: 

  • Yarn in colours of your choice
  • Yarn needle
  • Twisted cotton rope  
  • Floral wire 
  • Wire cutters
  • Needle and thread 
  • Masking tape 
  • Glue gun 
  • Upholstery needle and thread
  • Jute craft twine

The method

Sizing

Being inspired by Marching North’s crafting method, you’ll need to start by deciding on the size of your rainbow wall hanging. Be it a small complimentary hanging, or the focal point of a room, choose the length and width of your rope accordingly.

Lining up

Once you’ve cut your rope into five sections – with each one getting progressively shorter – and you’ve used some masking tape to secure the ends, line them up into the classic curved shape of a rainbow. 

Fringing preparation

To get an even fringing, make sure that you’re lining your ropes up evenly. Armed with your pen, mark where you would like the yarn to begin and end. 

Attaching the wire

Next up, it’s time to attach your floral wire to the cotton ropes. Cut your wire so that it’s long enough to fit within the two marks you previously made. Thread your wire through the rope’s middle to secure it in place, using small blobs of glue. as you go along 

Wrapping

Starting with your longest piece of cotton rope, hold your first coloured yarn up to the first mark, wrapping it around until you reach the second mark. When you reach this point, tie a tight knot, snip your yarn and use your needle to thread down the end. Be sure to keep everything tight, covering the rope without any gaps, avoiding overlapping the yarn. Repeat this process with the other pieces of rope.

Assembling the rainbow

After completing the wrapping process for every piece of rope, it’s time to start sewing your rainbow together – you’re almost done now, promise. Beginning with your two smallest pieces of rope, sew them together in a zig-zag pattern, making sure to pull the thread tight with each stitch. This will be done at the back of your rainbow, so you can keep the front looking nice and neat, ready for your guests to admire. After you’ve repeated this process the whole way around, secure in place with a tight knot (using some glue to ensure that nothing will come undone) and begin working on your next piece of rope, eventually stacking each part of your rainbow together. 

Jute hanger

By this stage, your crafting project should really start coming together. However, the process wouldn’t be complete without a hanging mechanism. Jute craft twine is the ideal material for this- due to its durability and strength- so you won’t need to worry about your rainbow wall hanging crashing down to the floor. Your jute hanger only needs to be about five inches long, so once you’ve snipped off a piece, double it over and secure with an overhand knot. Sew this into the back of your rainbow, adding some glue for additional durability. 

Fringing

Now you can remove your masking tape from the ends of your rope to start creating the fringing for some added interest. To do this, separate the loose strands using a comb, fluffing each piece up as you go along. 

And there you have it! A super easy method, yet impressive result. All you need to do now is decide where to position your rainbow rope wall hanging, but we’ll leave that part up to you. 

For more advice on the best materials to incorporate into your next big crafting project, get in touch with a friendly member of our team today! Being rope experts, we’ve got just about everything you could need to get the job done. 

Featured photo source: Marching North

Posted on Leave a comment

What should be in your fishing kit?

River Fishing

If you’re a first time angler and keen to land a catch, it’s essential that you do your homework and build your fishing checklist before heading for the water. Thankfully, we’re here to help you with that step, covering what should be in your fishing kit to guarantee that the whole process runs swimmingly. 

Tackle box

A tackle box is an efficient storage solution for all of your fishing must-haves, fitted with different compartments that keep items separate. The avid fisher knows that organisation is key when it comes to making a catch, so make sure to stay on top of this before heading off. Items that you could include in your tackle box are:

  • Additional fishing line
  • Floaters 
  • Weights
  • Hooks 
  • Bait
  • Small torch 
  • Suncream 

Fishing rod and reel

If you’re only now dipping your toe into the fishing world, it’s easy to become overwhelmed by the number of rods and reels that are out there. With so many different sizes and styles to choose from, how can you possibly go about finding the one? Quality is always key when it comes to making the selection, but try not to invest in a design that’s overly complex and difficult to navigate. 

When it comes to finding the right length, you’ll need to establish what type of fishing you’ll be doing. For example, longer rods are designed for longer casts, whereas rods on the shorter side do limit how far you can throw the line, but they are easier to control. Whichever fishing rod you decide to go for, it should definitely be included in your fishing kit. If you miss this off your checklist, you won’t be catching anything anytime soon. 

Fishing line

Fishing line will connect the bait to your fishing rod, which can then be cast at different distances to tempt a fish, hopefully leading to a winning catch. Just as before, it can be incredibly hard to make a final decision when there are so many varieties of fishing line available. Once you’re aware of the key factors to look out for, this job can be made so much easier. 

Firstly, you’ll need to evaluate the fishing line’s strength (which is measured in pounds). Your choice here will ultimately depend on the species of fish you’re going after, with bigger fish requiring a stronger line. At the same time, the key to fishing is to travel light, so make your choice wisely. 

Secondly, the fishing line’s material. Nylon is the most commonly used fibre, offering plenty of flexibility and strength. With this being a material that’s been used for centuries, there are newer brands coming into the mix, such as Spectra and Dyneema. Through high-tech technologies, they’ve been able to produce an ultra-strong polyethylene fibre that’s able to float as a result of its lightness. Alongside bearing the castability, line memory (whether it retains its shape after casting) and line stretch in mind, you should be on your way to selecting the best fishing line. 

Floats

So, what else should be in your fishing kit? Next up on the checklist are floats. These will be attached to the end of your fishing line, used to show whether a fish has become interested in your bait. If you see this bobbing up and down, you’re in luck! There are different sizes of fishing floats that each have varying uses, with some being more ideal for certain weather conditions or in certain areas. Again, you’ll need to firstly establish how and where you’ll be fishing, making your choice accordingly. 

Landing net

A landing net is another fishing essential, so don’t forget to bring one along with you. This will be used to safely hold the fish so that you can take a peek at it before releasing it back into its habitat. Before purchasing this, consider the species that you’re intending on catching, which will consequently affect the size of the net mesh and of the net as a whole. Just as before, bigger species will require stronger nets, and those of the small variety won’t require something with as much strength and size. 

Bait

From live baits to grocery baits, you won’t be able to tempt a fish without offering it a tasty snack first. Whether you’re planning on getting rid of some fish-friendly food waste, such as hot dogs, cheese, or frozen shrimp, or maybe you can get your hands on some live bait, such as worms, minnows, leeches or frogs, your choice may depend on how squeamish you are. Luckily there are plenty of options out there to suit every fish and fisher alike. 

DIY fishing rod rack

For items that you can’t fit in your tackle box – such as your fishing rod – keep them secure and organised by making a DIY fishing rod rack; polypropylene ropes are ideal for the purpose, with their strength, durability and flexibility. 

If you look at the back seat of your car, there’s a handle situated near the roof that’s often used as a makeshift clothes hanger. In this scenario, it’ll act as the base for your DIY rod rack. To begin crafting this handy piece of equipment, choose a long rope that can fit the width of your car, stretch it across from one side to the other, looping each end through the handles we mentioned. 

Next, bring the two ends of the rope together into the middle and use hooks to secure them in place, sliding them out of the way once you’re done. 

After testing the tension of your rope fishing rod rack and ensuring that everything is firm, you can carefully slide your fishing rod or rods between the cord and roof of the car, with the eyelets facing downwards. A simple yet cost-effective solution.

DIY rope shelter

If you’ve read our previous post that highlights the different rope types and their strength, you’ll know that polyester rope and tarp will be your saving grace when it comes to sheltering from inevitable British showers, due to its durability and strength. When you’re out fishing, it’s highly likely that the weather will turn at some point in the day, so you’ll need to be prepared – regardless of the season. 

Some polyester rope, a pair of trees to tie your cord around and a sheet of tarpaulin work together to create the perfect fishing DIY tarpaulin shelter, keeping the ground beneath your feet and your fishing equipment dry, whatever the weather. 

You can rely on rope source to find all of the materials you need for your next fishing adventure, crafting project, or for within the workplace. Give us a call today to find the materials best suited for the job at hand. 

Posted on Leave a comment

Simple nautical home decor ideas

Home Décor on a Chair

If your home is in need of a revamp, what better way to transform your space from bland to beachy than with a few easy DIY projects? With these simple nautical home decor ideas, you can craft your very own pieces of furniture using easy-to-find materials, making use of natural, earthy tones, alongside the traditional sea blues and peaceful whites for a wonderfully playful theme. Let’s set sail and get straight to it… 

Nautical wreath

There’s no better way to get your front porch looking shipshape than with a DIY nautical wreath, a decorative take on a life preserver. All you’ll need for this easy crafting exercise is a foam wreath – you’ll be able to find one of these in a pound shop or hobby shop – a ruler, scissors, straight pins, cotton rope and two different colours of fabric – take blue and white as a classic, sea-themed example. Once you’re equipped with the materials, start to wrap your white fabric around the foam wreath, securing the beginning and end of your fabric strips down with the pins. Continue the wrapping motion until you’ve made your way around the whole wreath. Next, add the contrasting blue fabric to around ¼ of the wreath. 

To add the finishing touches, use your decorative cotton rope to place evenly around the wreath’s edges, pinning in place once complete. 

Rope vases 

Rope-wrapped vases make the perfect nautical decorative pieces, being a DIY method that’s as easy to follow as it is cost-effective. It’s a brilliant way to upcycle bits and bobs you may have lying around the house, such as empty food cans, that can be transformed into a fancy piece of furniture (although it may seem impossible at first). You’ll also need to equip yourself with jute rope – which is the ideal choice for adding a touch of nautical flair – super glue and scissors. Simply start at the bottom of your chosen can, swirling your rope around the edge and using a small dot of glue every so often to secure everything down. Work your way up to the top, snipping the rope and gluing the end down when complete. Who says that redecorating can’t be cheap? 

Nautical mirror 

A fun way to spruce up any basic mirror; why not wrap manilla rope around the edge to look as though it were hanging in a beach hut? To craft your own DIY nautical mirror, find a board that it can be super glued onto for a sturdy base, using your manilla rope to wrap around the outer edge of the mirror to make the frame. Prop your new mirror against a wall as it is, or you could add screws and wire to the back to make a hanging mechanism. 

Coasters

DIY nautical coasters are yet another super simple craft, and a great way to make your dining table look more inviting. You can use manilla rope for this one due to it’s durable, flexible and water-resistant qualities – protecting your table against any inevitable spillages. To make your base, you’ll need to find a circular object, such as a CD, and fabric to super glue onto your template. When choosing the latter, just make sure that the material is strong and won’t be prone to fraying. Using your circular object as a stencil, trace around onto the material and cut out when you’re done. Next, hold your rope in the centre of the circle, and start spiralling it around, working your way to the outer edge. Snip your rope at an angle when you’re done, and secure it in place. And that’s all there is to it! Another simple nautical home decor idea that only takes a few minutes to create. 

DIY rope entry mat

The technique used to craft a DIY rope entry mat is almost identical to your nautical coasters, but you’ll need a lot more rope – depending on how big you want to make it. To set-up your crafting space, lay tarp or a cloth on the floor to protect the surface from superglue. Tape in place for sturdiness, and now you can begin spiralling your rope from the centre to the outer edge. When you feel as though your mat is big enough, snip off the end of your rope and secure it down. Simple.

Beachy garland

Who doesn’t love a bit of bunting? Not only will this brighten up your home and look fantastic on show during summer garden parties, it’s even more rewarding to step back and admire a product that’s been crafted from scratch. To start your next DIY project, you’ll need a heavy duty rope that’s able to support your hanging decorations – again, manilla rope is a good one for this – and twine to tie your decorative pieces to the main rope. Taking inspiration from Finding Home’s method, you could use mason jar caps, shells, starfish and even driftwood to really bring out your maritime aesthetic – so if there’s any excuse to go scavenging on a beachy getaway, it’s this. All you’ll need to do is glue your nautical objects onto the twine, tying each one onto your main rope to finish off your nautical garland. 

If these simple nautical home decor ideas have piqued your interest, we have all the resources to support your next crafting project. Get in touch with our team today to see which of our high quality materials, from rope to twine, is best for you. 

Posted on Leave a comment

How to make a friendship bracelet

Friendship Bracelets

Origin of the friendship bracelet

The origin of the friendship bracelet is thought to have started with the Indigenous Peoples in Central and South America, being a common tradition that symbolised the bonding of souls. It honours the energy and time put into a friendship, used as a meaningful gift that would be worn with pride. 

They have made a lasting impact too, with friends continuing to craft their very own friendship bracelets for each other to show just how much they care well into the 21st century. Whether as a birthday present, for a special occasion, or simply an excuse to get involved with a touch of crafting, they make the perfect gift. So, if you’ve ever wondered how to create one, you’ve come to the right place. 

What will you need to make a friendship bracelet?

Before you start weaving, make sure to get your crafting tools together. Thankfully, you won’t be needing an awful lot for this delightfully simple DIY project. Coloured macrame string or decorative braids are ideal to use when crafting your friendship bracelet, as they come in an array of colours, they’re versatile, and slide effortlessly between the fingers. With so many combinations to choose from, you’ll be able to make your design completely unique. 

Now you’ve got the string, grab yourself some masking tape or a safety pin to keep everything in place whilst making the braid. This is a crucial step (especially for beginners), because it means you can focus all of your attention on the weaving process, rather than struggling to hold everything in place.

Finally, and this step is optional, you could incorporate letter beads and charms into your friendship bracelet for added personalisation. This will ultimately depend on your friend’s style, so choose whatever you think they would like best. Weave into any of the following designs as you see fit.

Friendship bracelet patterns

Alternating half hitch

To make a friendship bracelet with an alternating half hitch pattern, you’ll need to cut two strands of string in colours of your choice to around 5 foot long. Begin by making your loop by folding the top of the string in half, knotting in place in the middle. As mentioned previously, secure everything down with tape so that you can get an even braid. 

For the half hitch tie, you’ll need to make a clockwise loop with the string on your left (we’ll call this cord 2), wrapping it around cord one whilst holding everything tight. Now, use a similar technique with cord 1, this time making a counter-clockwise loop. Tighten as before. 

Alternate until you reach the end of your string. Et voila! 

5-strand braid

As the name suggests, you’ll need to start with five different shades of string to make your braid for the perfect colour explosion. Begin by snipping your string into ten pieces (which will be two per colour) to around 32” in length. Group your colours together, tying a knot at the top and securing down as with the alternating half hitch. 

Take the far left string and loop underneath the adjacent strand, then go over the next strand. Repeat this process on the other side, continuing with the under-over motion. 

Zipper bracelet

To make the zipper friendship bracelet, knot and secure two string cuttings for the top of your braid. Take the string on your left and make a forward backward knot around your base string, bringing it back to the side you originally started on. Repeat the process with your other string and tie a knot once you’ve reached the end.

Spiral staircase

For this next friendship bracelet pattern, get three colours of string and make your loop at the top to begin braiding. Separate one string apart from the other two and loop over both of them, pulling through to bring it back to the side you started on. Repeat this as many times as you like (the more you do it, the longer the chunk of colour will be), continuing on the process with the other two colours. 


From crafting friendship bracelets to aiding your work life, we have ropes, twines, cords and more to suit all of your needs. Get in touch with us today to find the materials for your next project.

Posted on Leave a comment

How to do eco-friendly gift wrapping

wrapped gift

The environmental effects of gift wrapping

Although wrapping a gift may seem perfectly harmless, it can end up costing the earth. A whopping 227,000 miles of wrapping paper is binned each year (with Christmas being a particularly wasteful period), which ends up slowly decomposing in landfills, releasing dangerous pollutants in the process. Research by Greenpeace revealed the scary reality; that 1kg of wrapping paper is responsible for emitting 3kg of CO2 into the atmosphere during production, which certainly isn’t contributing to a sustainable future. Not forgetting the countless gift bows, decorative glitter and reams of sticky tape that are particularly difficult to recycle. 

However, there are small aspects of daily life that you can change, with making a conscious habit to discover new ways to do eco-friendly gift wrapping being one of them. It’s a brilliant opportunity to get your crafting hat on, whilst adding a touch of uniqueness to your presents. 

Eco-friendly wrapping paper 

Reach for gift wrapping materials that are recyclable and biodegradable, with brown paper being especially environmentally-friendly. You could even use bits and bots lying around the house, such as decorative fabrics for regiftable “wrapping”, or even a newspaper that’s collecting dust on the side. Once tied up with some natural rope, you’ll start to see that this greener method is a much more cost-effective and clutter reducing. Perfect for all of your gifting needs. 

Reuse your wrapping

Although it seems like the natural thing to do, do NOT throw away any form of wrapping that remains intact. Many of your regular deliveries will be protected with bubble wrap, often coated in decorative tissue paper. When unwrapped carefully, you can then reuse these to gift your own presents, rather than purchasing new materials. 

Reuse shipping boxes

The same applies to shipping boxes too, which work particularly well if you don’t want your gift to get bent in transit. Again, unwrap your own deliveries carefully, storing them in a designated ‘reusing’ cupboard, ready for your next gift wrapping extravaganza. Just the same as previous methods, you’ll be saving not just the environment, but your money too. 

DIY stamps 

As mentioned in our wrapping ideas for Christmas blog post, it’s actually surprisingly easy to craft your own stamper. This DIY method will create the perfect finishing touch to your gift, and you can cut out your own stamping stencil into a variety of shapes. To remain as eco-friendly as possible, you could even make your own ink by using crushed berries for deep red tones. 

Taping your gift

Unfortunately, sticky tape that isn’t made of paper can’t be recycled, so think consciously when wrapping your presents. You might want to consider compostable paper tape or washi tape instead, which are both biodegradable alternatives. Crafted from wood fibres, pulp and natural adhesives, these materials break down faster in comparison to regular packaging tapes, without polluting the atmosphere.  

Tying up your gift

If you’ve already checked out our blog post on how to use ropes for crafting, you’ll know that there are many eco-friendly alternatives out there for adding the finishing touches to your gift wrapping. Natural ropes are the perfect green solution, such a twisted jute rope and hemp rope, being two brilliant, reusable examples. Alongside being biodegradable and recyclable fibres, they will give your gift wrapping a delightfully rustic feel too! What’s not to love? 

If you’ve been inspired by these ideas on how to do eco-friendly gift wrapping, what are you waiting for? Have a chat with our team today to replenish your crafting cupboard.