
Rain is inconvenient for lots of reasons, but flooding has the potential to severely damage your property. The risk of flooding is one you shouldn’t ignore, but luckily there are some simple ways to limit the damage.
You can use sandbags for flooding protection, and this is an affordable way of preventing water damage. Because sandbags are usually made from hessian fabric, they are easy to stack on top of each other.
Read on to learn how to make sandbags that will prevent flood damage to your property.
How to fill your sandbags
How many sandbags will you need?
Depending on how large your sandbag wall needs to be, you need to work out how many sandbags you actually need. It’s usually recommended to have around 60 sandbags. This will create a sturdy wall that’s one foot high and ten feet long. You should also calculate how much sand is needed to fill all of the bags – an average sandbag will take around 35-40 lbs of sand to adequately fill. Do all these calculations before starting work on your sandbag wall to prevent any mishaps or delays in building your wall. It’s better to overestimate than to underestimate, so plan for your wall to be slightly higher than you initially want it to be.
How much you should fill your sandbags
Sandbags should only be filled about two-thirds of the way. A sandbag that’s too full will be difficult to work with and carry. One that’s not full enough will be difficult to stack, and it’ll take more bags to create a nice, sturdy wall. Keep your sandbags between halfway to two-thirds full with sand for the best results.
Sealing your sandbags
Don’t tie your sandbags – this makes them difficult to stack and doesn’t allow the sand to move around as much. Instead, close the bag by folding the top of the sack over and placing it down. Make sure the bag is nice and level so that your wall doesn’t become lopsided and uneven.
How to build the sandbag wall
Positioning the sandbag wall
Before you begin building your sandbag wall, remove any debris or other clutter out of the way. You’ll need your surface to be as flat and even as possible. This will make the wall building process much easier and ensure that it stays standing.
Make sure to leave a gap between the sandbag wall and your property. If the pressure of the water forces the sandbags against the wall, this could cause more damage. Instead, leave around 8 feet between the sandbags and your building to prevent any structural damage. Because the sandbag wall shouldn’t be leaning on anything else, it’s especially important to build a strong foundation for your wall.
Constructing the sandbag wall
Now that you have cleared the best area for your sandbag wall, it’s time to start building it. This is a strenuous task, and it’s recommended that you have a couple of other people to help you. To start, you should aim for a wall that’s 3x wider than it is tall. This means your bottom layer will contain the most sandbags, creating a solid foundation. Lay out a row of sandbags side by side, and continue to add more rows behind it until you’ve created a base that’s roughly three feet wide.
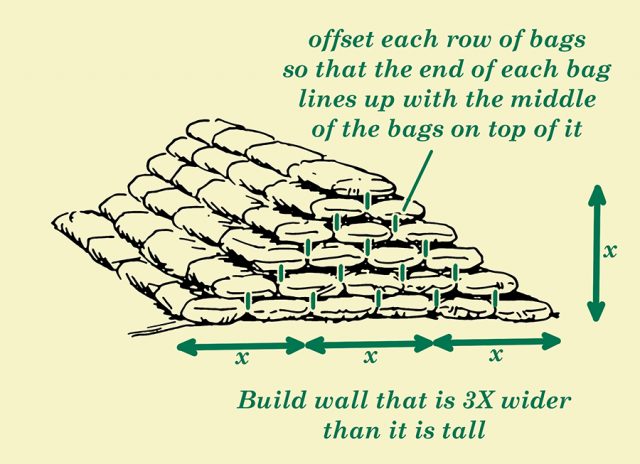
Next, begin on the second layer of sandbags. These should be offset so that they’re in the middle of the previous row of sandbags. Place each sandbag directly in the middle of the sandbags below it, so that each layer you add begins to create a pyramid shape. Continue this process until your sandbag wall is at your desired height.
Waterproofing
Once your sandbag wall has been constructed, you’ll need to waterproof it with some plastic sheeting. This should be placed only on the side of the wall that the water will be coming from. Place sandbags at the top and bottom of the sheet to keep it in place, making sure the sheet isn’t stretched too tight. If the sheet is stretched tight, the force of the water could rip it, allowing water to permeate through your sandbag wall.
Your sandbag wall should now be complete, and your property will have an extra layer of protection from flooding. For a wide range of DIY materials from washing line rope to macrame cord, contact us for great deals.